

iPhone Stuck on Apple Logo? Causes, Solutions & How to Fix It Without Losing Data
If your iPhone is stuck on the Apple logo, keeps restarting, or is trapped in a boot loop, don’t panic. This is a common problem, and in many cases, your data may still be safe.
Over the years, we have diagnosed and repaired many iPhones with this exact problem. Some cases are caused by iOS or software issues, while others are related to hardware faults.
The important thing is to diagnose the problem correctly before attempting a repair, especially if you have important photos, WhatsApp messages, contacts, or other data stored on the iPhone.
In this guide, I’ll explain the troubleshooting process we use and what you can safely try yourself before sending the iPhone for professional diagnosis.
Why Is My iPhone Stuck on the Apple Logo?
An iPhone that cannot finish starting up generally falls into two broad categories:
1. Software-related problems
Something has gone wrong with iOS, preventing the operating system from loading normally.
2. Hardware-related problems
A component inside the iPhone is malfunctioning and preventing the startup process from completing.
Both can produce similar symptoms. Your iPhone may:
- Stay on the Apple logo for a long time
- Show the Apple logo and then restart
- Continuously repeat the same startup process
- Enter recovery mode
- Fail during an iOS update
- Display an error on the computer during an update
This is why we don’t recommend assuming that a boot loop automatically means the motherboard, storage, battery, or another particular component has failed.
Proper diagnosis matters.
First Priority: Protect Your Data
If you have important data inside the iPhone, do not rush into restoring or erasing the device.
A common mistake is trying multiple repair programs, repeatedly restoring the iPhone, or following random troubleshooting instructions without understanding what those procedures actually do.
Some third-party iOS repair tools may claim they can fix an iPhone stuck on the Apple logo without data loss. Be cautious with these claims.
Software cannot repair every boot-loop problem because not every boot loop is caused by software. If the underlying problem is hardware-related, software alone cannot repair the damaged component.
For this reason, our approach is to start with the least invasive troubleshooting method and avoid erasing the iPhone whenever data recovery is the priority.
Important: If your photos, messages, WhatsApp history, or other files are valuable to you, do not choose Restore unless you understand the consequences. Restoring an iPhone can erase the data stored on the device.
What Can Cause an iPhone Boot Loop?
There isn’t one single cause.
From our repair experience, an iPhone stuck on the Apple logo can be related to problems such as:
- An interrupted or unsuccessful iOS update
- Extremely low available storage
- Corrupted system files
- Hardware or motherboard faults
- Liquid or moisture damage
- Damage caused by a drop or impact
- A malfunctioning internal component
- Previous repair damage
The symptoms alone are usually not enough to determine the exact cause.
That’s why our first objective isn’t to guess which component is faulty. The first objective is to determine whether the problem is software-related or hardware-related while protecting the customer’s data whenever possible.
Let’s start with the software side first.
Step 1: Try an iOS Update Without Erasing the iPhone
If the problem is software-related, the first troubleshooting method we recommend is reinstalling or updating iOS through Recovery Mode.
The goal is to reinstall the operating system without intentionally erasing your personal data.
You will need:
- A Mac or Windows PC
- A stable internet connection
- A reliable USB cable
- Enough free storage space on the computer
On newer Macs, you can manage the iPhone through Finder. On Windows, depending on your setup, you may use the Apple Devices app or iTunes.
If you’re not comfortable performing these steps yourself and the data inside the iPhone is important, consider getting help before proceeding.
Put the iPhone Into Recovery Mode
The button combination depends on your iPhone model.
For iPhone 8 and later, including iPhone X and newer models:
- Connect the iPhone to your computer.
- Quickly press and release the Volume Up button.
- Quickly press and release the Volume Down button.
- Press and continue holding the Side button.
- Keep holding it even when you see the Apple logo.
- Release the button when the Recovery Mode screen appears.
For older iPhone models, the button combination is different, so make sure you follow the correct Recovery Mode procedure for your model.
Don’t worry if your iPhone is already stuck on the Apple logo or continuously restarting. You can still attempt to put it into Recovery Mode.
What Should Recovery Mode Look Like?
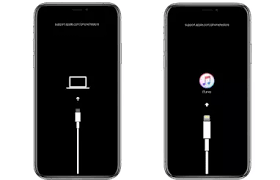
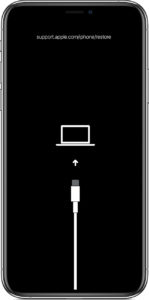
When Recovery Mode is entered successfully, the iPhone should display a screen showing a cable pointing toward a computer or a similar recovery symbol.
The exact image may look different depending on the iOS version.
If the iPhone continues showing only the Apple logo, try the Recovery Mode procedure again.
Also check the basics:
- Try another USB cable
- Try another USB port
- Make sure the iPhone has sufficient battery power
- Check whether the charging port is damaged or has a poor connection
- Make sure the required Apple software on the computer is up to date
If you still cannot enter Recovery Mode, don’t immediately assume the motherboard is faulty. A damaged button, charging port, cable, computer connection, or an internal hardware problem can all interfere with the process.
Step 2: Choose Update — Not Restore
Once your computer detects an iPhone in Recovery Mode, you should normally see options to Update or Restore.
If your priority is keeping the data:
Choose UPDATE first.
The Update option attempts to reinstall iOS without intentionally erasing the existing user data.
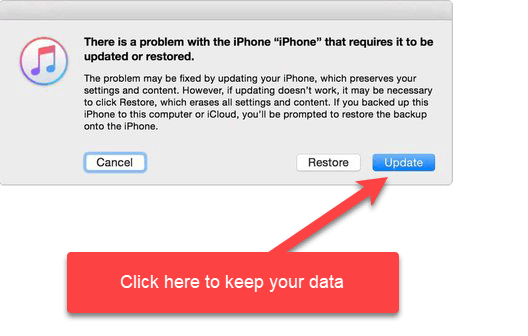

Be Very Careful With the Restore Option
Restore is different from Update.
Choosing Restore erases the iPhone and reinstalls iOS. If you do not already have a usable backup, this can result in the loss of your photos, messages, WhatsApp data and other information stored only on the device.
So if you’re troubleshooting an iPhone specifically because you need to recover the data, do not choose Restore as your first troubleshooting step.
After selecting Update, your computer will download the required iOS software and begin the installation process.
Depending on your internet connection, the download may take some time. Make sure your computer has sufficient free storage and avoid disconnecting the iPhone while the update is in progress.
What Happens After the Update?
his step gives us useful diagnostic information.
Generally, you will see one of these outcomes:
Scenario 1: The update completes and the iPhone starts normally.
Good news — the problem was likely software-related. Once you regain access to the iPhone, make a backup as soon as possible.
If the progress bar has already started moving before the update fails, the situation can be more complicated.
For example, if the progress bar moves some distance and then the computer reports an error, it may indicate that iOS was already being written or modified before the process was interrupted.
Possible causes can include:
- Corrupted iOS or system data
- Extremely low or completely full storage
- NAND/storage-related problems
- Communication problems between the processor and storage
- Other motherboard faults
In this situation, there may be a higher risk to the existing data, especially if the filesystem or system data has already become corrupted.
However, don’t immediately assume that the data is permanently lost.
The actual condition of the device needs to be checked before making that conclusion.
Scenario 2: The iOS Update Fails and an Error Code Appears
If the update process fails and your computer shows an error code, pay attention to where the progress bar stopped on the iPhone.
From our repair experience, this can provide useful clues about what happened during the update.
There are two common situations:
Scenario 2A: The Progress Bar Started, Then the Update Failed

If the progress bar has already started moving before the update fails, the situation can be more complicated.
For example, if the progress bar moves some distance and then the computer reports an error, it may indicate that iOS was already being written or modified before the process was interrupted.
Possible causes can include:
- Corrupted iOS or system data
- Extremely low or completely full storage
- NAND/storage-related problems
- Communication problems between the processor and storage
- Other motherboard faults
In this situation, there may be a higher risk to the existing data, especially if the filesystem or system data has already become corrupted.
However, don’t immediately assume that the data is permanently lost.
The actual condition of the device needs to be checked before making that conclusion.
Scenario 2B: The Progress Bar Does Not Start or Stops Near 0%
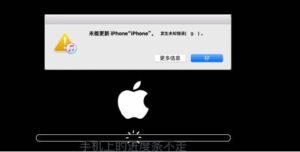
This is different from Scenario 2A.
If the update fails before the progress bar begins moving, or while it is still very close to 0%, the phone may be failing before iOS begins writing significant changes to the storage.
From our experience, this can sometimes be a better sign for data recovery.
Possible causes include:
- A motherboard communication problem
- The processor being unable to communicate correctly with the NAND/storage
- Power-related faults
- Damaged motherboard circuitry
- A failed internal component preventing the update from starting properly
- NAND/storage failure
In many of these cases, the existing user data may still be present because the update process did not progress very far.
However, this is not a guarantee.
If the NAND itself is severely damaged or no longer communicating, data recovery can become much more difficult or, in some cases, impossible.
This is why we don’t judge the condition of the data from the error code alone.
Don't Diagnose the iPhone From the Error Number Alone
You may see errors such as:
- Error 9
- Error 35
- Error 40
- Error 4013
- Error 4014
- Error 1110
The error number is useful information, but it doesn’t always identify one specific failed component.
For example, seeing Error 4013 does not automatically mean one particular chip must be replaced.
Different faults can produce similar error codes.
When diagnosing these cases in our workshop, we consider several things together:
- The error code
- Where the progress bar stopped
- How the iPhone behaves before and during the update
- Whether the computer consistently detects the device
- The motherboard’s physical condition
- Power and communication behaviour
- Previous repair or liquid-damage history
Only after combining these clues can we decide what should be tested or repaired next.
This is especially important when data recovery is the priority. Replacing parts without confirming the actual fault can make recovery more difficult.
If the Failed Update Leaves the iPhone in Recovery Mode
After an unsuccessful update, the iPhone may remain stuck on the Recovery Mode screen.
At this stage, repeated software attempts may not solve the underlying problem.
If you’ve already checked the computer, cable and USB connection and the update consistently fails at the same point, a hardware problem becomes more likely.
If the data is important, this is usually the point where I recommend stopping further experiments and having the phone properly diagnosed before attempting anything that could erase or further alter the data.
Scenario 3: Update Completed, But the iPhone Is Still Stuck on the Apple Logo
If the iOS update completes successfully but the iPhone still stays on the Apple logo or continues restarting, this is an important diagnostic clue.
It means the iPhone was able to complete the software update, but something is still preventing it from booting normally. At this stage, a hardware-related problem becomes more likely.
From a data-recovery perspective, this can sometimes be a more encouraging situation because the update itself was completed successfully. Your personal data may still be intact, although this cannot be guaranteed until the device is properly diagnosed.
If you’re experiencing this situation, the FAQs below cover some of the most common questions we receive about hardware-related boot loops, previous drops, liquid exposure, motherboard problems and data recovery.
FAQs
Why Is It a Hardware Problem If Nothing Happened Recently?
This is a question we hear very often:
“My iPhone was working normally. I didn’t drop it or get it wet recently, so how can this suddenly be a hardware problem?”
The important word here is recently.
A hardware problem doesn’t always appear immediately after the damage occurs. Sometimes an iPhone can continue working normally for weeks or even months before the symptoms begin.
For example, think back and consider whether your iPhone has ever:
- Been dropped onto a hard surface
- Suffered a strong impact
- Come into contact with water or other liquid
- Been exposed to moisture
- Had its screen, battery or another component replaced
- Been opened or repaired previously
Any of these can be relevant to the diagnosis, even if they happened a long time ago.
Previous Liquid or Moisture Exposure
Liquid damage is a good example.
An iPhone may continue working after being exposed to liquid, leading you to believe that everything is fine. However, moisture inside the phone can cause corrosion that develops gradually.
If that corrosion eventually affects an important component, connector or motherboard circuit, the iPhone may suddenly develop problems such as restarting or becoming stuck on the Apple logo.
This is why, when we diagnose an iPhone with a boot-loop problem, we usually ask about its full history, not just what happened immediately before the problem started.
Something that happened several months ago may still provide an important clue.
Previous Repairs Are Important Too
If your iPhone has been repaired before, let the technician know.
This does not necessarily mean the previous technician did anything wrong. We simply need to know the repair history because a previously opened device may have replacement components, previous motherboard work, signs of liquid damage, or other conditions that can help us diagnose the current problem.
The more information we have about the iPhone’s history, the easier it is to narrow down the actual cause.
So if your iPhone suddenly becomes stuck on the Apple logo even though “nothing happened recently,” don’t immediately rule out a hardware problem.
The cause may have started much earlier — the symptoms are only appearing now.
Apple Replacement or Refurbished Unit?
Sometimes a customer tells me:
“This iPhone has never been dropped. It was an Apple replacement unit.”
This is useful information, but it doesn’t completely rule out previous physical damage.
Over the years, I have repaired a number of Apple replacement and refurbished iPhones with boot-loop or motherboard-related problems. During motherboard inspection, I have sometimes found signs that suggest the board may have experienced physical stress or damage sometime in its history.
This can be confusing for the current owner because, from their point of view, the phone may never have been dropped or damaged at all.
And I believe them.
If you received the iPhone as a replacement unit, you may simply have no way of knowing the complete history of every internal component before the device came into your possession.
This is why I don’t want customers to feel that I’m blaming them when I ask:
“Has this iPhone ever been dropped?”
I’m not saying that you dropped it.
I’m trying to understand the history of the motherboard and determine whether previous physical stress could be related to the current boot-loop problem.
A motherboard can sometimes continue working after physical stress and only develop obvious symptoms later. This is one reason an iPhone can appear perfectly normal for a long time and then suddenly become stuck on the Apple logo.
So if your iPhone is an Apple replacement or refurbished unit, please mention it during diagnosis. It is another piece of information that may help us understand what happened to the device.
Real Repair Case: iPhone Stuck on Apple Logo Caused by a Corroded Sensor Flex
The video below shows a real iPhone we diagnosed with a stuck Apple logo / boot-loop problem.
In this case, the problem was not caused by iOS or a failed software update. During diagnosis, I traced the fault to a sensor flex cable.
After inspecting the flex cable, we found visible signs of water corrosion.
Once the faulty flex was identified and the problem was properly repaired, the iPhone was able to boot normally again.
Watch the repair video below to see the diagnosis and the actual cause of the boot loop.
Why I'm Sharing This Repair Case
This is a good example of why an iPhone stuck on the Apple logo should not automatically be diagnosed as a software problem or a motherboard problem.
The symptom may look the same, but the actual cause can be very different.
In this particular case:
Symptom: iPhone stuck on the Apple logo / boot loop
Cause found: Faulty sensor flex cable
Physical evidence: Water corrosion on the flex
Solution: Identify and repair the faulty component
Result: iPhone booted normally again
It also demonstrates why liquid exposure can be relevant even when an iPhone does not fail immediately after getting wet.
Corrosion may develop or worsen over time, and eventually a damaged component can begin interfering with the iPhone’s normal startup process.
This is why proper diagnosis is so important.
Rather than guessing which part is faulty based only on the Apple logo symptom, we test the device, isolate the problem and look for evidence of what is actually causing the boot loop.
What Should You Do If It Is a Hardware Problem?
If you have already attempted an iOS Update through Recovery Mode and the iPhone still cannot boot normally, or the update repeatedly fails, it may be time for a hardware diagnosis.
If the data inside your iPhone is important, I recommend avoiding unnecessary Restore attempts or random component replacement.
You can send the iPhone to us for diagnosis.
We will first check the condition of the device and determine what is preventing it from booting normally. If motherboard-level troubleshooting is required, we will diagnose the fault before recommending the appropriate repair.